 …Or, “Is there a way to pause the animation so the character is not moving when no key is being pressed, yet remain facing the same direction it was moving in?” That is a question posted in the comments on my “Creating 2D Animated Sprites using Unity 4.3” post by Chris. Rather than answer in the comments section I thought this topic was important enough, and long enough, to warrant a whole post.
Getting Setup
Well start where we left off in the original post with our walking professor. In order to connect the dots, we will need to create four new animations, one for each direction the professor can be pointed in. We’ll use the technique discussed in “Creating a Single Frame Animation using Unity 4.3 2d Workflows, the better way”. Follow the next steps for each direction:
- Drag the first image from the walking animation onto your scene to create a GameObject. Make sure it’s selected in the Scene Hierarchy.
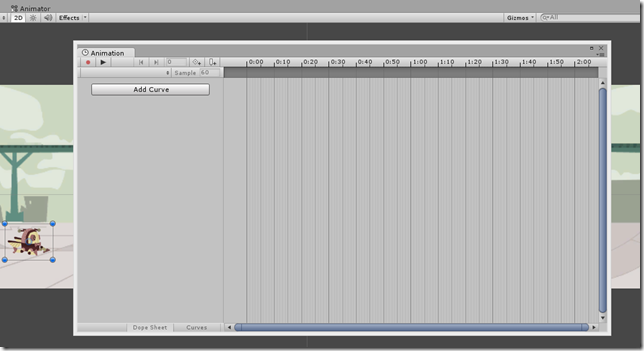
- Open the Animation window, using CTRL-6 or Window->Animation from the menu.

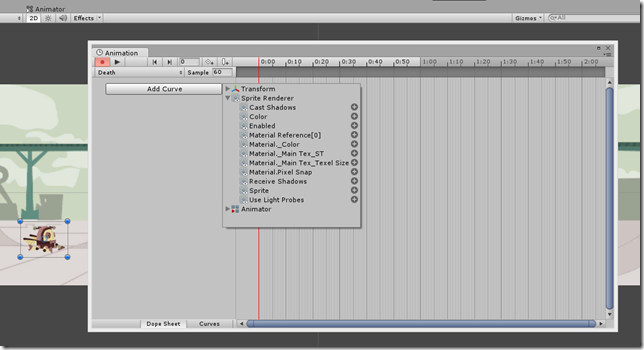
- Click the ‘Add Curve’ button, and save the new animation as “professor_idle_[Direction].anim”.
- In the popup window that appears next to the ‘Add Curve’ button, expand Sprite Renderer, and click the ‘+’ button to the right of ‘Sprite’.

- Close the Animation window.
If you have done this correctly for each direction, you will now have 4 new animations named professor_idle_north,anim, professor_idle_east,anim, professor_idle_west,anim and professor_idle_south,anim. You’ll also have 4 new GameObjects in your scene, and 4 new Animation Controlles which we do not need. Delete the extra GameObjects and Animation Controllers, mine are all named ‘professor_walk_##’ so they were easy to locate.
Configuring the Animation Controller
Now that we have the animations all configured we can start hooking that up into our existing Animation Controller, which is named ‘professorAnimatorController.controller’. Lets open that up to make a few additions.
There are several ways you could go about doing this, you could add an additional state for each direction that is the idle state. But then you’d have to add transitions from each idle state to each walk state, that’s an additional 16 transitions, plus 4 for each walk to their associated idle state, a total of 20 additional transitions. That would make this diagram virtually unusable.
So there is a better way, and that is to use a Animation BlendTree. This will allow us to transition from walking to idle in a single state. Lets start with the south state and change it to use a BlendTree.
 First we will need another parameter to control the BlendTrees. Let’s call it ‘Speed’. Click the ‘+’ on the Parameters toolpane to add a new Float parameter, and use “Speed” as the name. Also set it to default to a value of 1.0.
Next we can change the ‘professor_walk_south’ state to a BlendTree. Right Click on the the state, and select ‘Create new BlendTree in State’ from the context menu. Initially it looks like nothing changed, however if you select the state, the inspector will show you the ‘Motion” property is now set to a value of “Blend Tree” instead of the animation for the professor walking south. Double Click the State to edit the Blend Tree.
The Blend Tree starts out empty, but there are a few things to note. I’ve highlighted the parameter selection in the image below. Unity automatically picked the ‘Speed’ parameter for us because it was the only float parameter we have, If you are using more than one float parameter, you’ll have to choose the correct one.
The last step is to associate our two animations into the Blend Tree. That is done through the Motions list. Add a Motion for the walk animation by clicking the ‘+’ sign, and select ‘Add Motion Field’. You can then drag the ‘professor_idle_south.anim’ onto the first field. Repeat that process again for the ‘professor_walk_south.anim’ file. So the trick to getting the animations to change is the threshold value on each Motion. For the idle animation the threshold should be ‘0’ and for walk we need a ‘1’. This will allow us to change the ‘Speed’ parameter from 1.0 to 0.0 and the Blend Tree will switch from the walk animation to the idle animation because the threshold was reached.
Repeat the above steps for each direction, and then we can change our playerController so we can see the animation in action. You can navigate back up to the base layer in the Animator by clicking the “Base Layer” button in the breadcrumbs.
Lastly to wrap this all up, lets modify the playerController.cs file. Double click it in the Project toolpane to open your favorite IDE. Modify the Update method to look like the following:
// Update is called once per frame
void Update()
{

    var vertical = Input.GetAxis("Vertical");
    var horizontal = Input.GetAxis("Horizontal");

    if (vertical > 0)
    {
        animator.SetInteger("Direction", 2);
        animator.SetFloat("Speed", 1.0f);
    }
    else if (vertical < 0)
    {
        animator.SetInteger("Direction", 0);
        animator.SetFloat("Speed", 1.0f);
    }
    else if (horizontal < 0)
    {
        animator.SetInteger("Direction", 1);
        animator.SetFloat("Speed", 1.0f);
    }
    else if (horizontal > 0)
    {
        animator.SetInteger("Direction", 3);
        animator.SetFloat("Speed", 1.0f);
    }
    else
    {
        animator.SetFloat("Speed", 0.0f);
    }
}
The changes that were made set the Speed parameter to “1.0f” if the character is moving, and to “0.0f” if the character is not.
Save your scene and run it to see the changes in action! If you do not press any of the arrow keys, the Professor should not be animated and continue to face the last direction moved. As you press a directional arrow, the Professor should run the walk animation for that direction.
Wrapping Up
While creating multiple frame/image animations is fairly straight-forward in Unity using the 2D workflow, discovering how to handle some edge cases is not. This post has shown you how to blend animations together without a lot of messy state transitions and ugly diagrams.


 Download the sample code from Bitbucket